QUESTION: Can you tell me how to bench test solenoids?
GURU: You know, I guess that is something I should cover. It seems no matter how I write it; some people just do not get it. So maybe this is a better way to approach this. I think where people get confused is understanding how the solenoid is activated. So let’s simplify that a tad.
A solenoid, contactor, relay or whatever you want to call it is nothing more than an electrical on/off switch. When you flip your light switch on at your home that is a switch. A mechanical switch activated by physical force. When you turn a key switch on your automobile to the start position you are sending a voltage signal to the car’s solenoid. You are electrically activating a solenoid to start your car. Solenoids have all sorts of configurations, all sorts of voltages and sizes. But they all do the same thing they make and break an electrical circuit for a on or off mode.
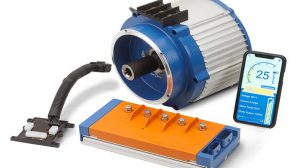
In order to understand some basic things about bench testing let’s point out some of the major parts. Large terminal or lugs are used for heavy cable connections. Small terminals are used for solenoid activation. Footprint just means the size and shape of the mounting area or size. Inside the solenoid is a movable iron core. Inside is a wrapping of copper wires called a field. Hundreds of strands of wire make up a field. Usually, a solenoid based on application, will be a single pole – single throw or a single pole – double throw. This just means the number of contacts used between the large terminals or lugs. Most common are a normally open set. Some have a set of normally open and a set of normally closed contacts.
How the contacts make and break are based on the voltage being applied to the small terminals. That voltage passes through the fields creating a magnetic field. This magnetic field pulls the iron core downwards or upwards depending on manufacturer. This movement pulls the contacts together and causes voltage and current to flow. Once voltage is removed the field collapses and the contacts open. Very simple and efficient way of an electric on/off switch.
Bench testing begins with knowing what the coil voltage is. Most common voltages are 6, 12, 24, 36 and 48 volts. Some voltages are dictated by what the voltage of the car is. Let’s say we have a solenoid rated at 36 volts. We could just connect the solenoid to 36 volts and see if it “clicks”. While in a “clicked” position you should read continuity across the large terminals or lugs. If not the contacts are worn out. What if the solenoid did not “click”? Usually, that means the solenoid coil is open. Either way you have a loss of contact or coil activation, the solenoid is defective.
You can also test the solenoid coil with a VOM (Volt, Ohmmeter). On a low scale ohms say 200 connect across the two small terminals. You should see some sort of value in terms of resistance. 55-60 Ohms or 180-190 ohms. The resistance value is based on manufacturer, iron core size, and voltage rating of the car system. I cannot tell you an exact resistance value because of that reason. I can only say you will read a very low resistance value. It takes very low current to activate a solenoid. Usually, on the side of a solenoid it shows the manufacturers name and model of the solenoid. You can go on-line and find the exact values. But the bottom line is; if you do not read a resistance across the two small terminals the coil is open.
Large and small terminals usually are not polarity sensitive unless a diode is used between the two small terminals. For resistance values remove the diode. Sometimes you will see a resistor across the large terminals. Remove the resistor for testing.
If no problems are seen with the bench testing the problem is in the car.